Build a Musical Band
For this project, our task was to construct three, homemade musical instruments that can play all seven notes and display specific concepts related to physics. We did a large amount of research and obtained our knowledge to write up a justification to present to the class. The second part to our assignment included playing our instruments to a song, whether it be original or a cover, it was to show that our instruments can truly play all seven notes. Once the songs are finalized, we presented them at the end of the STEM gathering.
String Instrument: Cardboard Ukelele
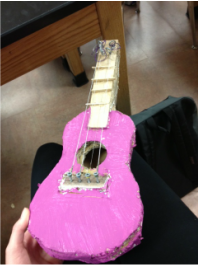
Our first instrument we decided to build was a scaled down version of a ukelele. We chose to use cardboard as the main structure of our instrument, along with a foam material to add additional support. My group and I then came up with an idea to use old violin strings as our ukelele strings, so that the sound would resonate better, creating a crisper note. Our neck to our ukelele was made out of wood, as opposed to cardboard, so that when the strings vibrate off of the surface, the sound wouldn't result in a flat thump. We also wrapped our strings around our tuners to provide us with the ability to either loosen or tighten, shorten or enlarge our strings. By adjusting the strings to any instrument, you are changing its frequency. The tighter or shorter the string is, the faster it vibrates, the greater the tension, and thus a higher pitch. My group and I also inserted a sound hole in the center, like most string instruments, so that it serves the purpose as an amplifier to increase volume. Finally, to firmly attached the strings to the base of the ukelele, we placed another block of wood under the sound hole and drilled in nails to hold them. Further explanation about our instruments is seen in the justification section.
String Instrument: Cardboard Ukelele
Our first instrument we decided to build was a scaled down version of a ukelele. We chose to use cardboard as the main structure of our instrument, along with a foam material to add additional support. My group and I then came up with an idea to use old violin strings as our ukelele strings, so that the sound would resonate better, creating a crisper note. Our neck to our ukelele was made out of wood, as opposed to cardboard, so that when the strings vibrate off of the surface, the sound wouldn't result in a flat thump. We also wrapped our strings around our tuners to provide us with the ability to either loosen or tighten, shorten or enlarge our strings. By adjusting the strings to any instrument, you are changing its frequency. The tighter or shorter the string is, the faster it vibrates, the greater the tension, and thus a higher pitch. My group and I also inserted a sound hole in the center, like most string instruments, so that it serves the purpose as an amplifier to increase volume. Finally, to firmly attached the strings to the base of the ukelele, we placed another block of wood under the sound hole and drilled in nails to hold them. Further explanation about our instruments is seen in the justification section.
Wind Instrument: PVC Pipe Flute
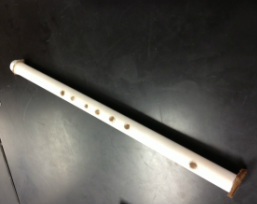
Our second instrument we decided to build was a flute, which incorporated many other elements from different instruments. Our group came to a compromise in selecting PVC pipe as the material used for building our flute because it was cheap, easy to use, and accessible anywhere. After doing some research, we found a notable source that supplied us with the needed information in which where to drill our holes. We then ran into a dilemma where our flute was not producing much sound, so we decided to cover up the opening, closest to the mouth piece, with a sturdy sheet of cardboard. In result, the sound became much louder and clearer.
Our second instrument we decided to build was a flute, which incorporated many other elements from different instruments. Our group came to a compromise in selecting PVC pipe as the material used for building our flute because it was cheap, easy to use, and accessible anywhere. After doing some research, we found a notable source that supplied us with the needed information in which where to drill our holes. We then ran into a dilemma where our flute was not producing much sound, so we decided to cover up the opening, closest to the mouth piece, with a sturdy sheet of cardboard. In result, the sound became much louder and clearer.
Chime Instrument: Copper Pipe Chimes
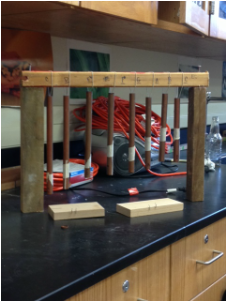
Finally, we put together a chime stand that held eight eight chimes, which were suspended on a wooden post. Our group used copper tubes and to have different pipes produce different pitches, we cut them to distinguish the sizes. The larger pipes create a lower frequency because it takes a longer amount of time for the vibrations to vibrate to make sound, and vice versa for the smaller chimes. We hung them with cotton strings and used nails to keep the different wood pieces together. After a few trials of hanging our chimes, we realized we need a substance to keep the string latched to the pipe, so we dabbed hot glue on the knots of the strings.
Finally, we put together a chime stand that held eight eight chimes, which were suspended on a wooden post. Our group used copper tubes and to have different pipes produce different pitches, we cut them to distinguish the sizes. The larger pipes create a lower frequency because it takes a longer amount of time for the vibrations to vibrate to make sound, and vice versa for the smaller chimes. We hung them with cotton strings and used nails to keep the different wood pieces together. After a few trials of hanging our chimes, we realized we need a substance to keep the string latched to the pipe, so we dabbed hot glue on the knots of the strings.
Justification:
Concepts:
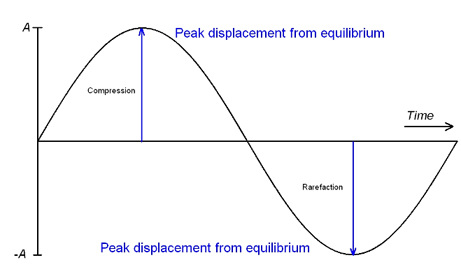
Sound Waves - a wave that consists of compression and rarefaction, which goes through an elastic medium.
Compression - a pulse of compressed air or other matter (push); opposite of rarefaction
Rarefaction - a disruption in the air or other matter in which the pressure is lowered (pull); opposite of compression
Wave - a disturbance through a medium
Medium - an intervening substance, such as air, that sound waves travel through
Crest - section of the wave where the wave is the highest point or where the disturbance is the greatest Wavelength - distance from top of crest to the following crest (m)
Period - amount of time between waves (P = 1/f)
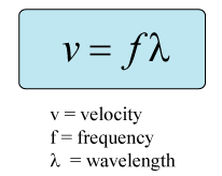
Frequency - number of vibrations per time (Hz)
Pitch - tells how high or low the sound frequencies seem to be
Node - area between a wave
Anti Node - the maximums and minimums of a wave
Transverse Waves - waves that vibrate at right angles to the direction the wave is traveling
Longitudinal Waves - waves that vibrate in the same direction as which they are traveling.
Resonance - occurs when the frequency of forced vibrations on an object matches the object's natural frequency, which then results in a increase in amplitude.
Amplitude - distance from midpoint to crest of a wave or midpoint to trough (minimum point of the wave)
Sound Waves - a wave that consists of compression and rarefaction, which goes through an elastic medium.
Compression - a pulse of compressed air or other matter (push); opposite of rarefaction
Rarefaction - a disruption in the air or other matter in which the pressure is lowered (pull); opposite of compression
Wave - a disturbance through a medium
Medium - an intervening substance, such as air, that sound waves travel through
Crest - section of the wave where the wave is the highest point or where the disturbance is the greatest Wavelength - distance from top of crest to the following crest (m)
Period - amount of time between waves (P = 1/f)
Frequency - number of vibrations per time (Hz)
Pitch - tells how high or low the sound frequencies seem to be
Node - area between a wave
Anti Node - the maximums and minimums of a wave
Transverse Waves - waves that vibrate at right angles to the direction the wave is traveling
Longitudinal Waves - waves that vibrate in the same direction as which they are traveling.
Resonance - occurs when the frequency of forced vibrations on an object matches the object's natural frequency, which then results in a increase in amplitude.
Amplitude - distance from midpoint to crest of a wave or midpoint to trough (minimum point of the wave)
|
|
|
Reflection:
I thought our group worked cooperatively together however, of course there were some issues that interrupted our progress. Such as our ukelele being constantly out of tune, our flute barely playing any notes, and our chimes not remaining stable on the stand. Although these obstacles weren't enjoyable to overcome, there were still several successes that made up for it. Our ukelele ended up being one of the strongest instruments while still looking esthetically pleasing. Our group had no confrontation in terms of selecting ideas to put into action. Finally, we managed our time well, so that we can edit and fix minor complications.
I have come to learn several new things while progressing through this project. For one, I gained a lot more knowledge in sound waves and how they are represented in musical instruments. I also gained a few new skills: how to properly tune a guitar or ukelele, curving your lips to play the flute, and I learned how to play different songs with the chimes. However a couple aspects I could improve on in terms of team cooperation is ensuring that my group and I are on task and on schedule, planing out before doing, and knowing that there is always time to make adjustments. Overall, this project was really enjoyable and I received a huge amount of information about sound waves that will definietly benefit me in the future.
Recap:
Peaks
1). Openly sharing ideas
2). Not being afraid of failure
Pits
1). Being a little off task
2). Not coming up with a detailed plan
before pursuing with our project
