Passive Solar Home Design
This project contained several elements that each held it's own purpose to complete. Our first assignment was to create a solar water heater to display the challenge of energy efficiency. Then we built a model of a house, to show different examples of daylighting techniques. The next step, was to start the actual process of our passive solar home design. We started by selecting a specific site for our building to be located, based of the following elements: sunlight exposure, visibility to community, ground levels and texture, student accessibility, orientation, and the purpose for the house. Then, we had to test possible materials that might be used to construct our structure. The materials listed as carpet, bamboo, dark hardwood, light tile, and dark granite for the floors; drywall, whiteboard, brick, stuco, redwood, corrugated metal, aluminum, and PVC for the inside or outside walls; and fiberglass,spray foam, styrofoam, and even coconut fibers for possible insulation. After, we drew blueprints, wrote up a materials list, and put together a presentable presentation. Throughout this process, we also conducted a wind turbine lab to get a new look at energy efficiency.
Solar Water Heater:
Solar Water Heater:
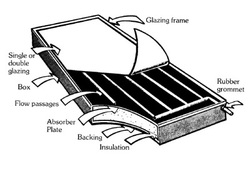 Example of a solar water heater
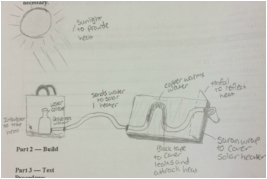
The materials need to construct the solar water heater are as followed: a large paper bag, small and large plastic tubing, copper pipes, a cup or bowl to catch the excess water, saran wrap, a bottle to insert the water into, some form of insulation, a box to hold the system, and a black sheet to attract heat. All these materials served as a different purpose to make the system more efficient. For the testing process, we started out by pouring a liter of water into the bottle that was placed in the insulated paper bag. The water then ran through the plastic tubing and into the copper piping that was kept inside the saran wrapped box. After running through the maze-like cycle of copper piping, the water fell into a stryofoam cup to then repeat the process. After about five minutes of cycling, we then took temperature of the water. In result, we noticed that none of the solar water heaters were being productive, only increasing one or two degrees, so some groups made improvements. A few clever refinements were adding a tinfoil shelf to reflect the light into the system, and enlarging the box completely.
Our Design
Daylighting Design and Techniques
Our next assignment was to build a cardboard model of a house to display several different types of daylighting. The process started by first sketching a layout of the dimensions of the house, along with the rooms. There was the requirement that the house must have the scale of 1000 sq. ft. Then we estimated how many light bulbs we think will need, and approximate the amount of time each bulb will be used per day. We calculated the energy consumption for a total of one day by using the equation:
(# of bulbs) × (Bulb wattage) × (average # of hours per bulb)
(1000 watts/kilowatt )
In result, we got a total of 13.68kW. Next, we added different types of daylighting techniques, and orientented our house to see where it would receive the most sunlight. On the roof, we added two skylights, and on the south and east side walls, we had several clerestory windows. We also placed several standard sized windows throughout all four walls of the house. In total, with the addition of these windows, we saved 1.58kW of energy due to lighting. To increase this amount, our group agreed that more windows should have been added to south side because that's were the majority of sunlight enters throughout the day. We also could have used more daylighting techniques such as light shelves and solar tubes. We then tested our models by hanging a light bulb, from a specific distance, to remble the sun. We moved the lightbulb at a consistent arc to see how our house would interact with the different times of day. As a result, it seemed pretty dim on the south end of our house. Slideshow of our design is seen below
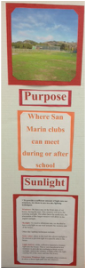
Site Selection
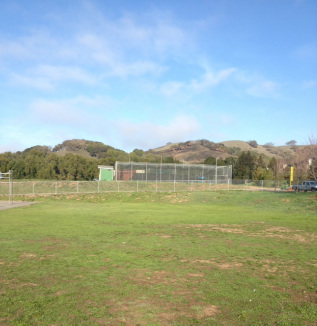
To begin the first section of our passive solar home design project, we had to find a suitable location. We started by brainstorming different elements that our location should contain. Such as an efficient amount of sun exposure, is visible to the community, displays physics concepts, easy to access by students, is able to fit the purpose of the building, and has leveled, solid grounds. After throwing out all those ideas, the groups searched for a suitable location. The top two locations were the open areas between the outdoor basketball hoop and Lefty Gomez Baseball Field (which was what our group selected), and the dirt patched area behind the school portables, along Novato Blvd. Our class selected these sites by rating them on a scale from 1 to 10 for each of the brainstormed categories. The location we selected is seen below.
To begin the first section of our passive solar home design project, we had to find a suitable location. We started by brainstorming different elements that our location should contain. Such as an efficient amount of sun exposure, is visible to the community, displays physics concepts, easy to access by students, is able to fit the purpose of the building, and has leveled, solid grounds. After throwing out all those ideas, the groups searched for a suitable location. The top two locations were the open areas between the outdoor basketball hoop and Lefty Gomez Baseball Field (which was what our group selected), and the dirt patched area behind the school portables, along Novato Blvd. Our class selected these sites by rating them on a scale from 1 to 10 for each of the brainstormed categories. The location we selected is seen below.
Materials Testing Lab
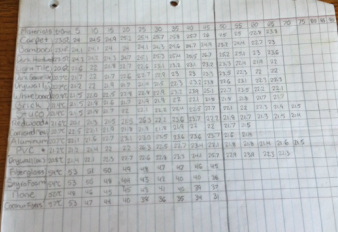
After all groups have selected their site, we started coming up with ideas of materials that could be used to build our house. The materials were carpet, bamboo, dark hardwood, light tile, and dark granite for the floors; drywall, whiteboard, brick, stuco, redwood, corrugated metal, aluminum, and PVC for the inside or outside walls; and fiberglass,spray foam, styrofoam, and coconut fibers for possible insulation. Each group was assigned two or materials to test to see which would result as the better option. Our group was given to test redwood and PVC. The testing procedure began by suspending a light bulb 20cm above the items, and after every five minuets, we recorded the temperature of the material. After 45 minuets of constant testing with the light bulb on, we turned it off and recorded the cool down time every five minuets for about 20 more minuets. After recording all the data from every group's materials, we analyzed the data by drawing up four graphs to compare and contrasts how each material did. We realized that each item served a different purpose. Such as carpet being good at absorbing heat because it captures the energy in the air pockets, the light tile reflecting heat well because of its light color, and fiberglass providing good insulation because it is able to trap heat within its fibers. With the results of this experiment, we can now determine which materials will interact with the sunlight the best.
After all groups have selected their site, we started coming up with ideas of materials that could be used to build our house. The materials were carpet, bamboo, dark hardwood, light tile, and dark granite for the floors; drywall, whiteboard, brick, stuco, redwood, corrugated metal, aluminum, and PVC for the inside or outside walls; and fiberglass,spray foam, styrofoam, and coconut fibers for possible insulation. Each group was assigned two or materials to test to see which would result as the better option. Our group was given to test redwood and PVC. The testing procedure began by suspending a light bulb 20cm above the items, and after every five minuets, we recorded the temperature of the material. After 45 minuets of constant testing with the light bulb on, we turned it off and recorded the cool down time every five minuets for about 20 more minuets. After recording all the data from every group's materials, we analyzed the data by drawing up four graphs to compare and contrasts how each material did. We realized that each item served a different purpose. Such as carpet being good at absorbing heat because it captures the energy in the air pockets, the light tile reflecting heat well because of its light color, and fiberglass providing good insulation because it is able to trap heat within its fibers. With the results of this experiment, we can now determine which materials will interact with the sunlight the best.
Experiment Data
|
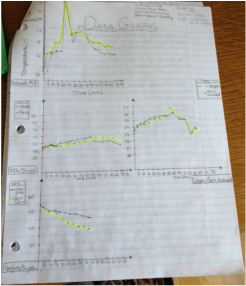
Data Graphs
|
Passive Solar Home Design
The elements needed to fully design our passive solar structure were one, a material list that included all materials need to build our house; two, digital or hand drawn blueprints of the walls, floors, and other aspects of the house; three, key features that show its energy efficient, along with other clever selling points; four, a scale model or physical prototype of the house; five, a presentation to put it all together.
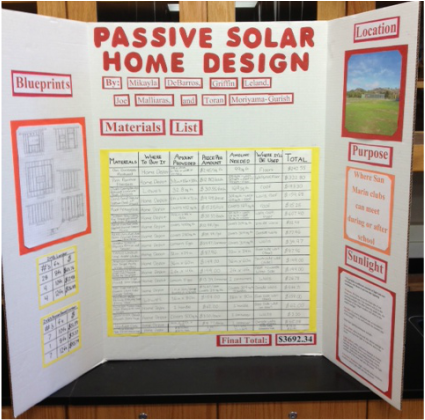
Materials: Our materials list consisted of many different items from dark hardwood floors to goldbond drywall, compound joint tape to fiberglass insulation, white cedar siding to driftwood roof shingles. In total the full list materials came to $3692.34 (without the cost of tax or simple tools).
Blueprints: Our blue prints were hand drawn, and specifically showed the framing of the house such as the placement of the windows, these are seen below.
Key Features: We had several key features regarding or house. We could insert more insulation into our walls and roof because our lumber for the framing, gave a big enough space. The price of our house is also well under budget, so we got to purchase high end siding, which is not only durable, but also looks very nice. We have a big window on the south side of our house because most of the sunlight enters through this direction. The location of our house is also a key feature because it covers most or all we listed for site selection.
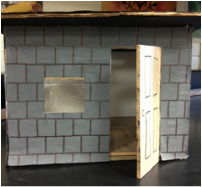
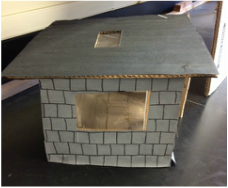
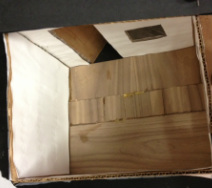
Scale Model: For our scale model, we made it out of cardboard and used construction paper to resemble different types of building material we will use. Such as the black roofing, we are going to use dark driftwood shingles. We are using white cedar that has tints of gray for our outdoor siding, so we painted it gray and drew checkered lines to show that it comes in bundled shingles. We used white construction paper to show the color of the drywall, and placed pieces of wood to resemble hardwood floors.
Presentation: We as a group decided that a three-fold board would be the best visual presentation to present to the audience. It would be easier to read and follow along than on a computer screen. We also wanted our model to be a physical prototype so that viewers will picture our house with a better understanding of what it would look like.
The elements needed to fully design our passive solar structure were one, a material list that included all materials need to build our house; two, digital or hand drawn blueprints of the walls, floors, and other aspects of the house; three, key features that show its energy efficient, along with other clever selling points; four, a scale model or physical prototype of the house; five, a presentation to put it all together.
Materials: Our materials list consisted of many different items from dark hardwood floors to goldbond drywall, compound joint tape to fiberglass insulation, white cedar siding to driftwood roof shingles. In total the full list materials came to $3692.34 (without the cost of tax or simple tools).
Blueprints: Our blue prints were hand drawn, and specifically showed the framing of the house such as the placement of the windows, these are seen below.
Key Features: We had several key features regarding or house. We could insert more insulation into our walls and roof because our lumber for the framing, gave a big enough space. The price of our house is also well under budget, so we got to purchase high end siding, which is not only durable, but also looks very nice. We have a big window on the south side of our house because most of the sunlight enters through this direction. The location of our house is also a key feature because it covers most or all we listed for site selection.
Scale Model: For our scale model, we made it out of cardboard and used construction paper to resemble different types of building material we will use. Such as the black roofing, we are going to use dark driftwood shingles. We are using white cedar that has tints of gray for our outdoor siding, so we painted it gray and drew checkered lines to show that it comes in bundled shingles. We used white construction paper to show the color of the drywall, and placed pieces of wood to resemble hardwood floors.
Presentation: We as a group decided that a three-fold board would be the best visual presentation to present to the audience. It would be easier to read and follow along than on a computer screen. We also wanted our model to be a physical prototype so that viewers will picture our house with a better understanding of what it would look like.
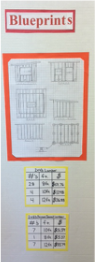
Blueprints
|
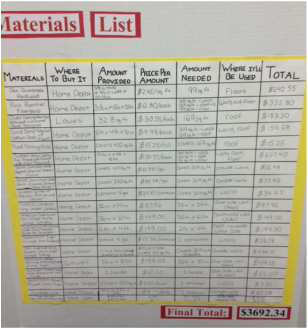
Materials List
|
Some Key Features
|
East Side
|
South Side
|
Inside
|
Final Presentation
Justification
In class, all groups we were assigned different energy sources to research. We had to answer how do these energy sources work and what are the positives and negatives of using it. Electricity is consumed so much by Americans that we spent a little over 100 dollars a month, which adds over to $1,200 a year. Because we use so much electricity, different forms of energy efficiency have been being used. My groups task was to research coal (fossil fuel) and nuclear/uranium. We found that coal is very cheap and is a stable infrastructure, however it destroys landscapes and pollutes the air. While nuclear energy generates a lot of power and pollutes very little, but uranium produces deadly waste that is highly dangerous and takes thousands of years for the waste to not be deadly. The link to the website is below.
In class, all groups we were assigned different energy sources to research. We had to answer how do these energy sources work and what are the positives and negatives of using it. Electricity is consumed so much by Americans that we spent a little over 100 dollars a month, which adds over to $1,200 a year. Because we use so much electricity, different forms of energy efficiency have been being used. My groups task was to research coal (fossil fuel) and nuclear/uranium. We found that coal is very cheap and is a stable infrastructure, however it destroys landscapes and pollutes the air. While nuclear energy generates a lot of power and pollutes very little, but uranium produces deadly waste that is highly dangerous and takes thousands of years for the waste to not be deadly. The link to the website is below.
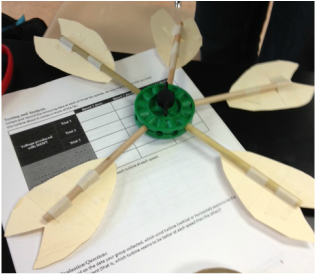
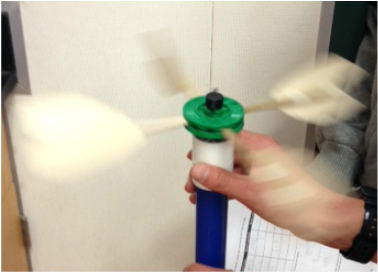
Wind Turbines
For this project, we had to design two different kinds of wind turbines, a HAWT (horizontal axis wind turbine) and a VAWT (vertical axis wind turbine). Wind turbines are Eco friendly by not produces any pollutions, however they aren't very efficient when not much wind is blowing and are harmful to birds. We made our HAWT and VAWT by cutting up heavy paper and shaping them they we think would think would run the fastest. After designing the blades of the turbine, we stick them on to wooden sticks and connect them to a green connector. We the turn on the fan and read the number on the device that measures the turbines speed. In result, our HAWT worked better. Its highest speed was 0.480W while our VAWT reached 0.250W.
For this project, we had to design two different kinds of wind turbines, a HAWT (horizontal axis wind turbine) and a VAWT (vertical axis wind turbine). Wind turbines are Eco friendly by not produces any pollutions, however they aren't very efficient when not much wind is blowing and are harmful to birds. We made our HAWT and VAWT by cutting up heavy paper and shaping them they we think would think would run the fastest. After designing the blades of the turbine, we stick them on to wooden sticks and connect them to a green connector. We the turn on the fan and read the number on the device that measures the turbines speed. In result, our HAWT worked better. Its highest speed was 0.480W while our VAWT reached 0.250W.
|
|
Concepts
Conduction- the transfer of heat through a specific material (solid). Ex: a pot conducts heat to food
Convection- the transfer of heat through liquid or gas. Ex: Ice melting
Radiation- energy transmitted as rays, waves, or particles. Ex: sun through space
Insulation- materials that are bad conductors. Ex: fiberglass
Fluids- a substance, as a liquid or gas, that is able to flow and has the tendency to assume the shape of its container. Ex: water, blood, oxygen.
Pressure- the weight or force that is produced when something presses or pushes against something else. Force per surface area where force is normal to the surface, measured in pascals. Pressure= Force/Area. The deeper you go into water or the higher density of a liquid, the more pressure. The pressure due to a liquid= (density)(depth). Water density is measured either in g/mL or kg/L.
Boyle's Law- For a constant number of molecules of gas at constant temperature, the product of pressure and volume is constant.
Bernoulli's Principle- The statement that the pressure in a fluid decrease as the speed of the fluid increases. Ex: when there is lower pressure on top of airplane's wing, and higher pressure below the wing, the plane is pushed up into the air.
Laws of Thermodynamics- 0th: explains temperature of two systems are in thermal equilibrium with a third system. They are also in equilibrium with each other.
1st: conversation of energy- energy is neither created, nor destroyed. Heat is a form of energy.
2nd: entropy increases and disorder increases
3rd: temperature can never get to absolute 0. Heat always exists.
Ideal Gas Law- relates the variables of pressure, volume, temperature, and number of moles of gas within a closed system. PV=nRT (pressure x volume= # of atoms x R (constant) x temperature)
Buoyancy- The apparent loss of weight of an object immersed or submerged in a fluid.
Buoyant Force- The exerted upward force that is opposite in direction to gravity. This is the reason why lifting heavier objects is easier underwater.
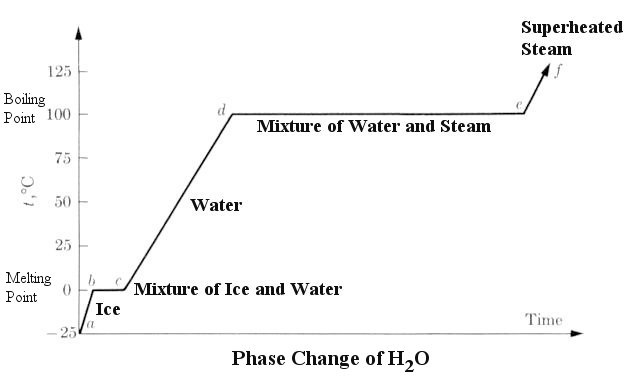
Phase Changes of Water-
Convection- the transfer of heat through liquid or gas. Ex: Ice melting
Radiation- energy transmitted as rays, waves, or particles. Ex: sun through space
Insulation- materials that are bad conductors. Ex: fiberglass
Fluids- a substance, as a liquid or gas, that is able to flow and has the tendency to assume the shape of its container. Ex: water, blood, oxygen.
Pressure- the weight or force that is produced when something presses or pushes against something else. Force per surface area where force is normal to the surface, measured in pascals. Pressure= Force/Area. The deeper you go into water or the higher density of a liquid, the more pressure. The pressure due to a liquid= (density)(depth). Water density is measured either in g/mL or kg/L.
Boyle's Law- For a constant number of molecules of gas at constant temperature, the product of pressure and volume is constant.
Bernoulli's Principle- The statement that the pressure in a fluid decrease as the speed of the fluid increases. Ex: when there is lower pressure on top of airplane's wing, and higher pressure below the wing, the plane is pushed up into the air.
Laws of Thermodynamics- 0th: explains temperature of two systems are in thermal equilibrium with a third system. They are also in equilibrium with each other.
1st: conversation of energy- energy is neither created, nor destroyed. Heat is a form of energy.
2nd: entropy increases and disorder increases
3rd: temperature can never get to absolute 0. Heat always exists.
Ideal Gas Law- relates the variables of pressure, volume, temperature, and number of moles of gas within a closed system. PV=nRT (pressure x volume= # of atoms x R (constant) x temperature)
Buoyancy- The apparent loss of weight of an object immersed or submerged in a fluid.
Buoyant Force- The exerted upward force that is opposite in direction to gravity. This is the reason why lifting heavier objects is easier underwater.
Phase Changes of Water-
Reflection
Throughout all of these projects, I have come to not only learn a lot of new concepts, but also knew skills that will definitely benefit me in the future. When being part of a group, you can come to understand many things. One of the biggest skills that is required in a group setting is adaptability. In every group you encounter you have to adapt to a different way of going about things. For instance, it seems as if being in an all girl group you are more on the same page in terms of direction with the project, however being in a group with all guys, it is different because more people tend to have different opinions. But I truly enjoyed this group because we all seemed to be in agreement, and had fun during the process of all the projects. So I would categorize our ability to be in agreement as something that went well, along with keeping things in control and organized. However, two things I thought went poorly were the group's equal contributions and a little bit of time management. We were behind in our wind turbines because we didn't understand the instructions, and we didn't allow enough time to practice our presentation. Overall, I really enjoyed being a part of this group and gained a lot of skills throughout the process.
I've learned several things while accomplishing these projects. Such as knowing the time to take ownership and the importance of communication. I decided to take the lead role in completing the poster board and preparing everyone's roles in the presentation, because I felt that throughout the projects I wasn't contributing to my fullesrt potential so this was how I made up for it. I also learned sand gained the skill of communication. Communication is key in any group project because is there is none, nobody would be on the same page, thus leading to an unfinished assignment. However, there are definitely things I need to work on. Keeping my group on task is something I've been trying to work on. And I absolutely need to work on my contribution skills early on in the project.
Peaks:
1). Keeping organized as a group
2). Remaining in a civil agreement throughout the process
Pits:
1). Equal contributions
2). Time management
